Mitigation Blocks: Smart Money Trading Zones

What are Mitigation Blocks?
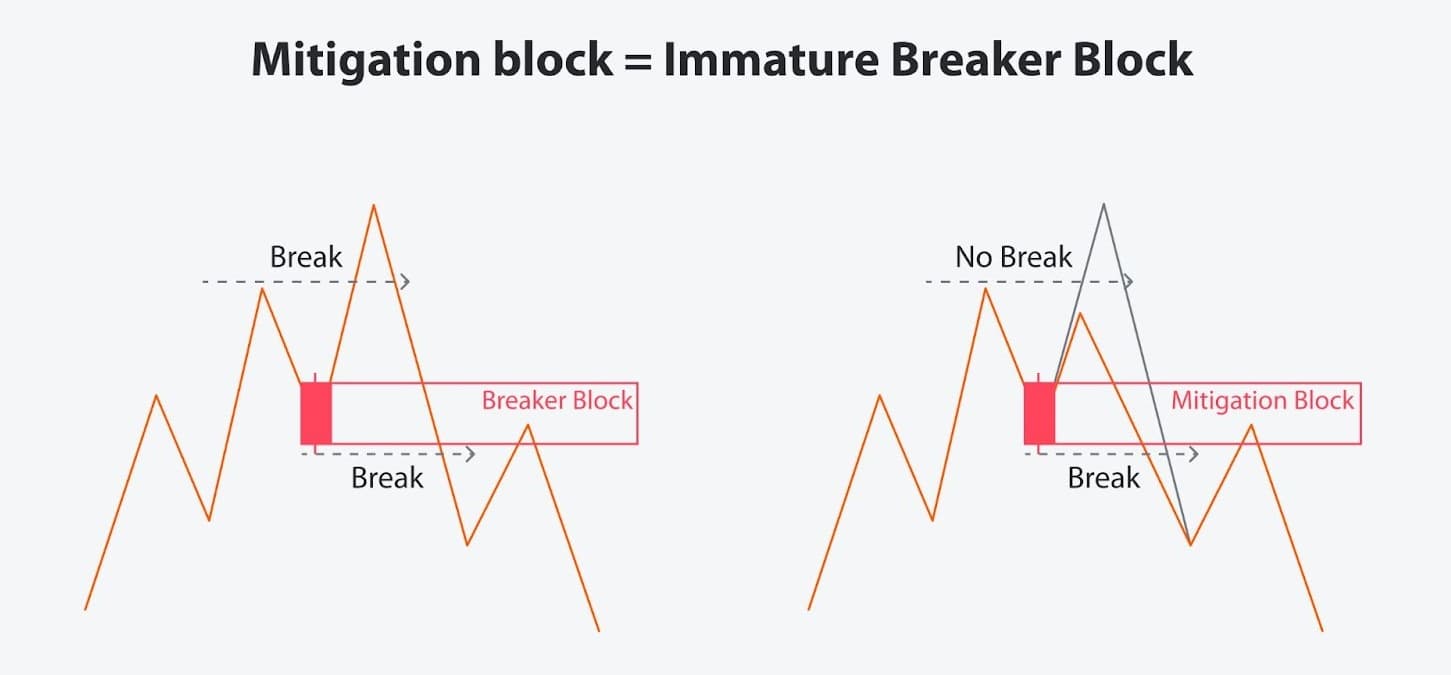
A mitigation block is an order block associated with a failed swing. Price attempts to continue the prevailing trend but fails to take out the prior swing high or low, then reverses and breaks market structure in the opposite direction. The candles that formed that failed swing point become the mitigation block: when price later returns to the zone, institutions use the retest to "mitigate" the losing positions they opened there — reducing or exiting them near breakeven before the new trend continues.
The defining detail is what happens before the reversal. Unlike a breaker block, which requires price to first sweep liquidity beyond the previous extreme, a mitigation block forms without that sweep: the prior high or low is never reached. This premature loss of momentum — the failure swing — leaves institutional orders stranded on the wrong side of the market once structure shifts against them.
The concept explains why markets so often retrace to a specific zone after a structure break before the new trend truly develops. By identifying the failed swing point in advance, traders can anticipate that retracement and position themselves with the new institutional order flow rather than fighting against it.
Types of Mitigation Blocks
Bullish Mitigation Block
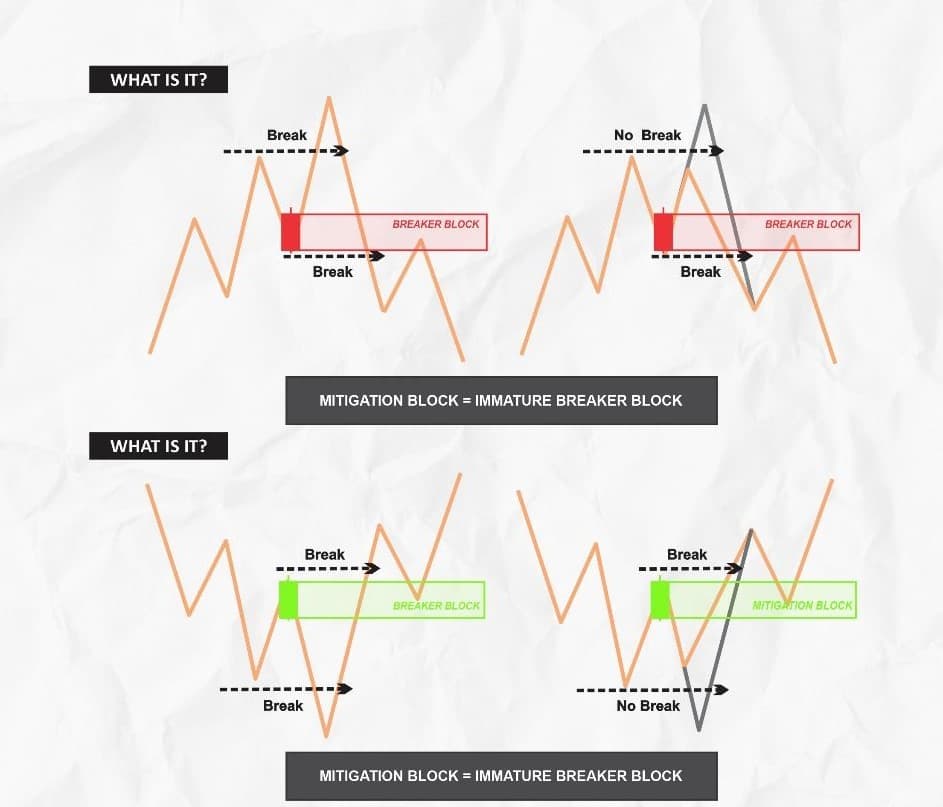
A bullish mitigation block forms when a downtrend ends through a failure swing instead of a liquidity sweep. The sequence looks like this:
- Price is in a downtrend, making lower highs and lower lows
- Price forms a swing low, retraces, then turns down again — but the next low comes in higher, failing to take out the previous swing low
- From that failed low, price reverses and breaks the swing high formed between the two lows, shifting market structure to the upside
- The down-close candle(s) that created the failed higher low become the bullish mitigation block
- When price later retraces into this zone, it often presents an opportunity to join the new bullish direction
The retest has a clear purpose: sellers who joined the failed continuation attempt are now trapped below the structure break. The return to the zone lets those positions be mitigated near breakeven while smart money builds longs for the next leg up.
Bearish Mitigation Block
A bearish mitigation block is the mirror image: an uptrend ends through a failure swing to the upside. The sequence looks like this:
- Price is in an uptrend, making higher highs and higher lows
- Price forms a swing high, pulls back, then pushes up again — but the next high comes in lower, failing to take out the previous swing high
- From that failed high, price reverses and breaks the swing low formed between the two highs, shifting market structure to the downside
- The up-close candle(s) that created the failed lower high become the bearish mitigation block
- When price later retraces into this zone, it often presents an opportunity to join the new bearish direction
Buyers who bought into the failed continuation attempt are left trapped above the structure break. The retest of the zone lets those longs be mitigated near breakeven while smart money distributes into shorts before the next leg down.
Why Mitigation Blocks Are Important
Mitigation blocks have become essential components of advanced price action trading for several key reasons:
- Structural Failure Point - They mark the exact zone where a trend continuation attempt failed, which is where the reversal was born
- Institutional Intent - The retest reveals large participants repairing positions caught on the wrong side of the structure shift
- High-Probability Trade Locations - When properly identified, they create excellent entry and exit points
- Market Structure Insight - They help traders understand how smart money engineers price movements
- Superior Risk Management - Mitigation blocks provide well-defined areas for stop placement
How to Identify Mitigation Blocks
Identifying mitigation blocks comes down to spotting a failure swing followed by a break of market structure:
For Bullish Mitigation Blocks:
- In a downtrend, identify the most recent swing low
- Watch the next push down: if it stalls and forms a higher low without taking out that swing low, you have a failure swing — no sell-side liquidity was collected
- Wait for price to break the swing high formed between the two lows (break of structure to the upside)
- Mark the down-close candle(s) that formed the failed higher low — that zone is the bullish mitigation block
- Expect price to retrace into the zone to mitigate trapped sellers before continuing higher
For Bearish Mitigation Blocks:
- In an uptrend, identify the most recent swing high
- Watch the next push up: if it stalls and forms a lower high without taking out that swing high, you have a failure swing — no buy-side liquidity was collected
- Wait for price to break the swing low formed between the two highs (break of structure to the downside)
- Mark the up-close candle(s) that formed the failed lower high — that zone is the bearish mitigation block
- Expect price to retrace into the zone to mitigate trapped buyers before continuing lower
Key Characteristics of Valid Mitigation Blocks:
- The failure swing is clearly visible: the prior swing high/low is approached but never taken out
- The reversal breaks market structure decisively, ideally with displacement (strong momentum candles)
- The zone is drawn from the candle bodies/wicks of the failed swing point itself
- Blocks formed on higher timeframes carry more weight than intraday ones
- The first retest of the zone after the structure break is the most reliable one
How to Trade Using Mitigation Blocks
Trading with mitigation blocks can be approached through these key steps:
- Identify the Mitigation Block - Use the guidelines above to locate valid mitigation blocks on your chart
- Anticipate the Return - Wait patiently for price to return to the mitigation zone
- Seek Confirmation - Look for additional confirmation such as candlestick patterns, divergence, or volume analysis
- Execute with Precision - Enter trades within the mitigation block zone with clear stop levels
- Target Strategic Levels - Set profit targets based on the next significant support/resistance or previous swing points
Mitigation Blocks vs. Other Concepts
Understanding how mitigation blocks compare to related concepts helps clarify their unique value:
Mitigation Blocks vs. Order Blocks:
- An order block is the last opposing candle zone before a successful move — the trend continues and the zone acts in its original direction
- A mitigation block is an order block whose swing failed: structure broke against it, so on the retest it acts in the opposite (new) direction
- Both can provide trading opportunities, but one trades continuation and the other trades the reversal born from a structural failure
Mitigation Blocks vs. Breaker Blocks:
- A breaker block requires a liquidity sweep first: price takes out the prior high/low, traps breakout traders, then reverses and breaks structure
- A mitigation block forms without a sweep: price fails to reach the prior high/low (failure swing) before reversing and breaking structure
- Both mark reversal zones after a structure shift; breakers are often considered higher probability because of the added fuel from trapped breakout traders
Important Considerations When Trading Mitigation Blocks
While mitigation blocks offer valuable trading insights, consider these important factors:
- Not Every Failure Swing Is Tradeable - Only zones confirmed by a genuine break of market structure qualify as mitigation blocks
- Context Is Crucial - Consider the overall market trend and conditions when evaluating mitigation blocks
- Timeframe Matters - Higher timeframe mitigation blocks generally have more significance
- Confluence Enhances Probability - Look for mitigation blocks that align with other technical factors
- Patience Is Required - Price may take considerable time to return to mitigation zones; avoid forcing trades
Conclusion
Mitigation blocks capture a specific market story: a trend tried to continue, failed to take out its previous extreme, and reversed hard enough to break structure. The zone left behind by that failed swing is where trapped institutional positions get repaired — and where disciplined traders can join the new direction with clearly defined risk.
Mastering mitigation blocks requires practice and a deep understanding of market structure. However, once integrated into your trading arsenal, they provide a powerful framework for anticipating price movements and aligning your strategy with institutional order flow.
Remember that while mitigation blocks can significantly enhance your trading edge, they should be used as part of a comprehensive trading approach that includes proper risk management, market context analysis, and continuous learning.