Rejection Block: ICT Strategy for High-Probability Reversals
What is a Rejection Block?
In ICT (Inner Circle Trader) methodology, a Rejection Block is a powerful price action setup that forms at major support or resistance levels following liquidity sweeps. It's characterized by long wicks that indicate strong rejection from these levels, representing the "last point of interest" for traders in the price delivery (PD) array sequence.
The concept revolves around identifying significant liquidity sweeps – where price moves beyond key levels to trigger stop losses – followed by a decisive rejection in the opposite direction. This rejection is visually represented by long wicks on candles and signals a potential reversal in market direction.
Rejection Blocks are especially valued in the ICT framework because they:
- Offer lower risk than other Price Delivery setups like Order Blocks and Fair Value Gaps
- Form at 80-90% retracement levels (deeper than Order Blocks, which typically form at 50-70% retracement)
- Provide high-probability entries after liquidity has been captured
- Create clear invalidation points for precise stop loss placement
- Signal a potential shift in market structure and direction
The Role of Liquidity Sweeps in Forming Rejection Blocks
To fully understand Rejection Blocks, we must first grasp the concept of liquidity sweeps. Liquidity refers to areas where a high concentration of buy or sell orders (particularly stop losses) exist in the market. Large institutional traders often "sweep" these areas by pushing price through key levels to trigger these stops, creating liquidity for their own larger positions.
This process creates the foundation for Rejection Blocks:
- Price moves to sweep liquidity at previous swing highs or lows
- After stops are triggered, price sharply reverses (creating long wicks on candles)
- This reversal indicates that the liquidity sweep was a trap, not a genuine breakout
- The long-wicked candles at these swept levels become the Rejection Block
- Market structure shifts in the direction of the rejection
This sequence represents institutional "smart money" first clearing out retail stops before reversing the market in their desired direction. By identifying these patterns, retail traders can align themselves with these larger market forces rather than falling victim to these traps.
Types of Rejection Blocks
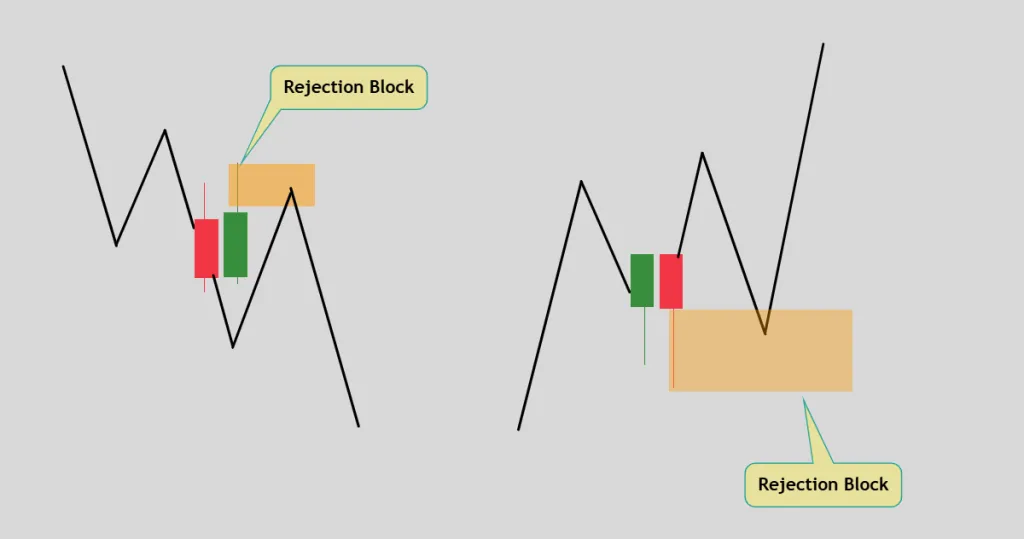
Bullish Rejection Block

A Bullish Rejection Block forms when:
- Price sweeps liquidity below previous swing lows (taking out sell stops)
- One or more candles form with long wicks to the downside, showing rejection of lower prices
- Price then moves upward, shifting market structure to the buy side
- The long wick(s) at the bottom is identified as the Bullish Rejection Block
This formation indicates that after stops were triggered below support, buyers stepped in aggressively, rejecting the lower prices and creating a potential reversal zone. When price later returns to this area, it often provides support for continuation to the upside.
Bearish Rejection Block
A Bearish Rejection Block forms when:
- Price sweeps liquidity above previous swing highs (taking out buy stops)
- One or more candles form with long wicks to the upside, showing rejection of higher prices
- Price then moves downward, shifting market structure to the sell side
- The long wick(s) at the top is identified as the Bearish Rejection Block
This formation suggests that after stops were triggered above resistance, sellers stepped in aggressively, rejecting the higher prices and creating a potential reversal zone. When price later returns to this area, it often provides resistance for continuation to the downside.
Identifying Key Characteristics of Valid Rejection Blocks
Not all long-wicked candles qualify as Rejection Blocks. To identify valid setups, look for these specific characteristics:
- Liquidity Sweep - Price must clearly sweep beyond significant previous swing points (highs or lows)
- Long Rejection Wicks - One or more candles must show substantial wicks, indicating strong rejection
- Market Structure Shift - Following the rejection, price should move in the opposite direction of the sweep, confirming a change in market bias
- Deep Retracement Level - Rejection Blocks typically form at 80-90% retracement levels, making them the "last defense" before a major move
- Volume Confirmation - Higher volume during the rejection phase strengthens the validity of the setup
The most reliable Rejection Blocks occur at significant market levels where large players are likely to defend their positions. These often coincide with key support/resistance zones, round numbers, or previous swing points with historical importance.
Practical Framework for Trading Rejection Blocks
To effectively implement Rejection Block trading in your strategy, follow this comprehensive framework that covers identification, confirmation, entry, and risk management:
Identification Phase
- Locate Potential Liquidity Areas: Begin by identifying areas on your chart where stop orders are likely to accumulate (previous swing highs/lows, significant support/resistance levels)
- Watch for Liquidity Sweeps: Monitor when price pushes beyond these levels, triggering stop losses
- Spot Rejection Patterns: Look for decisive rejection with long wicks forming after the sweep, indicating a potential reversal
- Confirm Structure Shift: Verify that market structure changes after the rejection (higher highs and higher lows for bullish setups; lower highs and lower lows for bearish setups)
Trade Setup Configuration
For Bullish Rejection Block setups:
- Wait for a retracement back to the rejection zone
- Enter buy trades when price returns below the body of the lowest open/close candle of the rejection formation
- Place stop loss 10-20 pips below the lowest point of the Rejection Block
- Target the next significant resistance level or a minimum 1:3 risk-reward ratio
For Bearish Rejection Block setups:
- Wait for a retracement back to the rejection zone
- Enter sell trades when price returns above the body of the highest open/close candle of the rejection formation
- Place stop loss 10-20 pips above the highest point of the Rejection Block
- Target the next significant support level or a minimum 1:3 risk-reward ratio
Validation and Filtering Criteria
Not all Rejection Blocks offer equal trading opportunities. Apply these filters to focus on higher-probability setups:
- Alignment with Higher Timeframe Trend: Rejection Blocks that align with the higher timeframe bias have higher success rates
- Confluence with Key Levels: Prioritize setups that coincide with significant support/resistance or Fibonacci levels
- Clean Price Action: Look for clear, distinctive rejection wicks rather than choppy, indecisive price action
- Depth of Retracement: The most powerful Rejection Blocks form at 80-90% retracement levels
- Recent Market Context: Consider the overall market environment and volatility conditions
Risk and Position Management Guidelines
Implement these risk management principles to protect your capital:
- Never risk more than 1-2% of your trading capital on a single Rejection Block setup
- Consider scaling into positions at different price levels within the Rejection Block zone
- Use partial profit-taking at predetermined levels to lock in gains
- Adjust stop losses to breakeven after price moves in your favor a certain distance
- Keep a trading journal specifically for Rejection Block trades to identify patterns in your success rate under different conditions
This structured approach to trading Rejection Blocks combines the identification of institutional footprints (through liquidity sweeps and rejections) with disciplined execution and risk management. By systematically applying these principles, you can effectively capitalize on these high-probability reversal zones.
Rejection Blocks vs. Order Blocks: Understanding the Differences
While both Rejection Blocks and Order Blocks are part of the ICT trading methodology, they have key differences that traders should understand:
| Feature | Rejection Block | Order Block |
|---|---|---|
| Formation | Forms from long-wicked candles after liquidity sweeps | Last opposing candle before a break of structure |
| Retracement Level | Typically at 80-90% retracement | Usually at 50-70% retracement |
| Risk Profile | Lower risk (tighter stop loss) | Moderate risk |
| Visual Indicator | Long wicks showing rejection | The entire candle body and wick |
| Position in PD Array | Last point of interest | Earlier in the sequence |
Both concepts can be effective when used correctly, but Rejection Blocks are often favored for their potentially better risk-reward profile. The smaller stop loss required for Rejection Blocks (due to their formation at deeper retracement levels) allows for more favorable risk-to-reward ratios.
Calculating Risk and Reward for Rejection Block Trades
One of the key advantages of trading Rejection Blocks is the favorable risk-reward profile they offer. Here's how to calculate and optimize this aspect:
Minimum Risk-Reward Ratio
For Rejection Block trades, aim for a minimum risk-reward ratio of 1:3. This means your potential profit should be at least three times greater than your risk. This calculation is straightforward:
- Risk = Distance from entry to stop loss (10-20 pips below/above the extreme of the Rejection Block)
- Reward = Distance from entry to profit target
- Risk-Reward Ratio = Reward ÷ Risk
For example, if your stop loss is 20 pips away from your entry, your profit target should be at least 60 pips away to achieve a 1:3 risk-reward ratio.
Target Selection
Consider these approaches for selecting profit targets:
- Previous Swing Points: Target the next significant swing high (for bullish trades) or swing low (for bearish trades)
- Fibonacci Extensions: Use 1.27, 1.618, or 2.0 extensions from the swing that created the Rejection Block
- Round Numbers: Major psychological levels often serve as natural profit-taking areas
- Multiple Targets: Consider scaling out of positions by taking partial profits at different levels
Timeframe Considerations
Rejection Blocks can be identified and traded across various timeframes, each with its own characteristics:
- Higher Timeframes (Daily, 4H): Provide the most reliable signals but require more patience and potentially wider stops
- Medium Timeframes (1H, 30M): Offer a good balance between frequency of setups and reliability
- Lower Timeframes (15M, 5M): Generate more frequent opportunities but with a higher percentage of false signals
For optimal results, consider a multi-timeframe approach:
- Identify the Rejection Block on a higher timeframe to establish the overall direction and key levels
- Drop down to a lower timeframe to fine-tune your entry when price returns to the zone
- This approach combines the reliability of higher timeframe analysis with the precision of lower timeframe entries
Tips for Trading Rejection Blocks Successfully
To maximize your success rate when trading Rejection Blocks, consider these advanced tips:
- Wait for Confirmation: Don't rush to enter trades; wait for clear confirmation that price is respecting the Rejection Block on retest
- Consider Market Context: Rejection Blocks work best when aligned with the broader trend or at key market turning points
- Look for Confluence: The most powerful Rejection Blocks occur where multiple technical factors align (support/resistance levels, trendlines, Fibonacci levels)
- Volume Analysis: Higher volume during the rejection phase and lower volume during retracement enhances the probability of success
- Be Patient: Not every Rejection Block will be retested, and not every retest will provide an optimal entry—wait for the best setups
- Manage Expectations: Even the most reliable setups aren't 100% accurate; always maintain proper risk management
Common Mistakes to Avoid
When trading Rejection Blocks, be aware of these common pitfalls:
- Misidentifying the Liquidity Sweep: Ensure price has genuinely swept beyond significant previous levels
- Ignoring Market Structure: Confirm that market structure has shifted after the Rejection Block forms
- Entering Too Early: Wait for price to properly return to the Rejection Block zone before entering
- Using Incorrect Stop Loss Placement: Always place stops beyond the extreme of the Rejection Block
- Overtrading: Focus on quality setups rather than quantity; not every long-wicked candle forms a valid Rejection Block
- Neglecting Risk Management: Even with high-probability setups, never risk more than a small percentage of your account on any single trade
Conclusion
Rejection Blocks represent one of the most powerful concepts within the ICT trading methodology. By identifying these specific price action patterns that form after liquidity sweeps, traders can pinpoint high-probability reversal zones that offer exceptional risk-reward opportunities.
The strength of the Rejection Block concept lies in its ability to identify points where smart money has shown its hand by defending key levels after clearing out retail traders' stops. This insight allows retail traders to align themselves with institutional activity rather than being caught on the wrong side of these powerful moves.
While mastering Rejection Blocks requires practice and screen time, the potential rewards are substantial. By focusing on the clearest examples, exercising patience, and maintaining discipline with your entries and risk management, you can effectively incorporate this powerful ICT concept into your trading arsenal.
Remember that Rejection Blocks are most powerful when used as part of a comprehensive trading approach that considers broader market context, multiple timeframes, and prudent risk management principles.