Premium and Discount Zones: Key Levels for Smart Money Trading
What are Premium and Discount Zones?
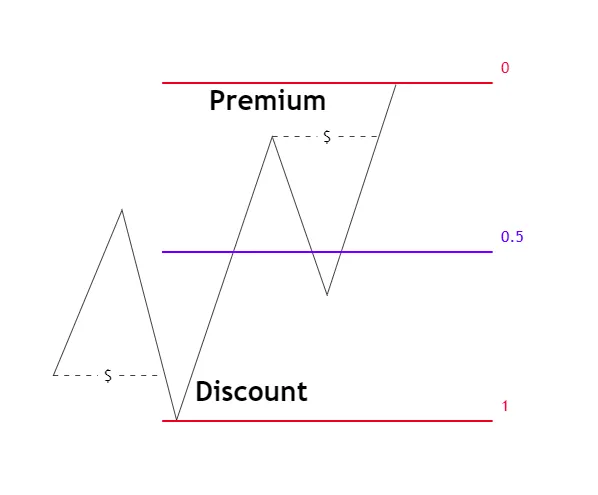
Premium and Discount Zones are essential price action concepts within Smart Money Concept (SMC) trading methodology that identify areas where price has deviated significantly from its fair value. These zones represent important imbalances between market supply and demand, creating high-probability trading opportunities for astute traders.
Premium zones (above fair value) and discount zones (below fair value) shown on a price chart
At their core, Premium and Discount Zones provide insight into institutional trading behavior. Institutional traders (smart money) operate with a simple principle: buy at discount and sell at premium relative to what they consider fair value. By identifying these zones, retail traders can align their strategies with institutional activity rather than trading against it.
The fundamental principle behind these zones is that markets tend to revert to their mean value over time. When price extends too far above (Premium) or below (Discount) this fair value, it creates imbalances that smart money traders exploit. These zones are not simply overbought or oversold areas but represent significant deviations from equilibrium where institutional order flow is likely to step in.
Types of Premium and Discount Zones
Premium Zones
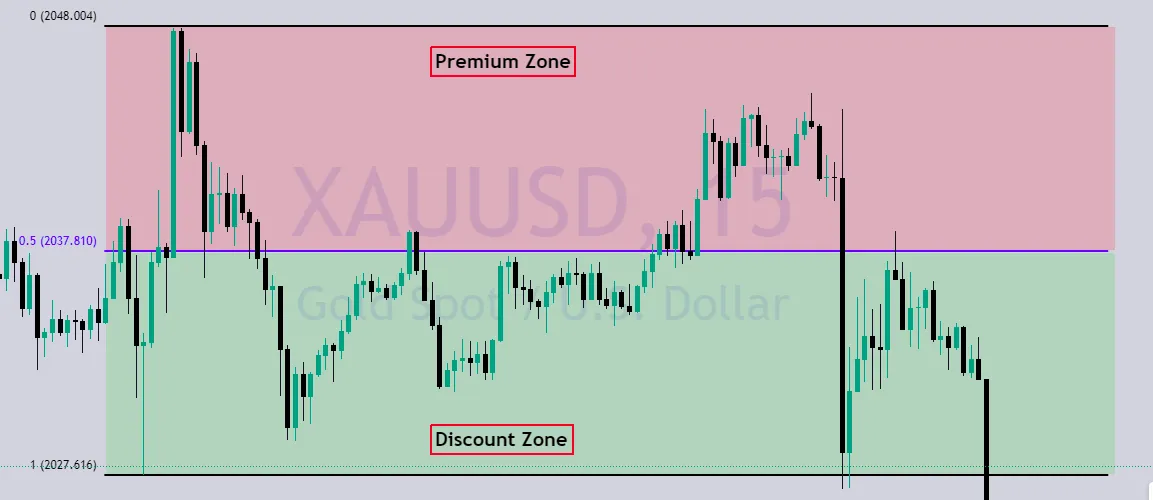
A premium zone where price is trading above fair value, creating selling opportunities
Premium Zones occur when price is trading significantly above the fair value reference, making the market "expensive" or at a premium. These zones are where institutional traders typically look to sell or distribute their positions. Key characteristics include:
- Location: Above the fair value reference price (often a moving average, VWAP, or session open)
- Institutional Activity: Areas where smart money typically distributes or sells positions
- Trading Bias: Primarily bearish, offering potential shorting opportunities when confirmed
- Formation: Created after strong bullish moves that extend price too far from equilibrium
- Confluence Factors: Most effective when aligned with key resistance levels, bearish order blocks, or overbought indicators
When price enters a Premium Zone, it doesn't guarantee an immediate reversal. However, it alerts traders to be vigilant for signs of selling pressure and potential short opportunities if confirmation signals appear.
Discount Zones
A discount zone where price is trading below fair value, creating buying opportunities
Discount Zones occur when price is trading significantly below the fair value reference, making the market "cheap" or at a discount. These zones are where institutional traders typically look to buy or accumulate positions. Key characteristics include:
- Location: Below the fair value reference price
- Institutional Activity: Areas where smart money typically accumulates or buys positions
- Trading Bias: Primarily bullish, offering potential long opportunities when confirmed
- Formation: Created after strong bearish moves that extend price too far from equilibrium
- Confluence Factors: Most effective when aligned with key support levels, bullish order blocks, or oversold indicators
Discount Zones represent areas of potential value where institutional buyers often step in to support price and drive it higher. These zones become particularly significant when they coincide with other technical factors that suggest a potential reversal.
How to Calculate Premium and Discount Zones
Calculating effective Premium and Discount Zones involves establishing a reference for fair value and then determining meaningful deviations from this level. There are several methods for calculating these zones:
1. Percentage-Based Approach
The percentage-based approach is straightforward and works well in markets with consistent volatility:
- Establish a Fair Value Reference:
- Common choices include the 200-period EMA, 50-period SMA, VWAP, or session open price
- Select a reference that best reflects the market's equilibrium price for your timeframe
- For example: Fair Value Reference = 200-period EMA = $100
- Calculate Zone Boundaries:
- Premium Zone = Fair Value + (Fair Value × Premium Percentage)
- Discount Zone = Fair Value - (Fair Value × Discount Percentage)
- Example with 3% deviation: Premium Zone = $100 + ($100 × 0.03) = $103
- Example with 3% deviation: Discount Zone = $100 - ($100 × 0.03) = $97
The percentage deviations typically range from 0.5% to 5%, depending on the market and timeframe:
- Forex majors: Often use 0.5% to 1.5% deviations
- Stock indices: Typically use 1% to 3% deviations
- Commodities: May require 2% to 5% deviations
- Cryptocurrencies: Often need 3% to 8% deviations due to higher volatility
2. ATR-Based Approach (Volatility-Adjusted)
The ATR-based approach adapts to changing market volatility, making it more versatile across different market conditions:
- Establish Fair Value Reference:
- Use the same reference methods as the percentage approach
- For example: Fair Value Reference = 50-period SMA = $100
- Calculate Average True Range (ATR):
- Use a 14-period ATR to measure recent market volatility
- Example: 14-period ATR = $2
- Apply ATR Multiplier to Define Zones:
- Premium Zone = Fair Value + (ATR × Multiplier)
- Discount Zone = Fair Value - (ATR × Multiplier)
- Example with 2× multiplier: Premium Zone = $100 + ($2 × 2) = $104
- Example with 2× multiplier: Discount Zone = $100 - ($2 × 2) = $96
Common ATR multipliers range from 1.5 to 3, with higher multipliers creating wider zones:
- 1.5× ATR: Tighter zones, more frequent signals, higher risk of false signals
- 2× ATR: Balanced approach suitable for most markets
- 3× ATR: Wider zones, fewer signals, but potentially higher reliability
3. Swing High/Low Midpoint Method
This approach uses the market's own structure to define Premium and Discount Zones, making it particularly effective in trending or ranging markets:
- Identify Significant Swing Points:
- Mark important recent swing highs and swing lows on your chart
- Focus on swings that represent true structural points rather than minor fluctuations
- In a ranging market, use the range extremes; in a trending market, use key retracement points
- Calculate the Midpoint (Fair Value):
- Fair Value = (Swing High + Swing Low) ÷ 2
- Example: If Swing High = $110 and Swing Low = $90, then Fair Value = ($110 + $90) ÷ 2 = $100
- This midpoint represents the equilibrium price between the extremes
- Define Premium and Discount Zones:
- Premium Zone starts at 0.5 (50%) to 0.618 (61.8%) of the range above midpoint
- Discount Zone starts at 0.5 (50%) to 0.618 (61.8%) of the range below midpoint
- Example with 0.5 multiplier: Range = $110 - $90 = $20
- Premium Zone starts at $100 + ($20 × 0.5) = $110
- Discount Zone starts at $100 - ($20 × 0.5) = $90
This method offers several advantages:
- Market-Adaptive: Zones are based on actual price structure rather than arbitrary percentages
- Fibonacci Integration: Can be enhanced by using Fibonacci ratios (0.382, 0.5, 0.618, 0.786) to define zone boundaries
- Range Alignment: Particularly effective during consolidation phases when price oscillates between defined extremes
- Historical Validation: Past price reactions at these levels often validate their significance
4. Multiple-Reference Confluence Method
For the highest probability zones, combine multiple reference methods to identify areas of confluence:
- Calculate Zones Using Multiple Methods:
- Apply the percentage-based approach using a moving average
- Apply the ATR-based approach for volatility adjustment
- Calculate swing high/low midpoints
- Consider VWAP or session open price
- Identify Confluence Areas:
- Look for overlapping zones from different calculation methods
- Stronger zones appear where multiple methods converge
- The more references that align, the stronger the zone
- Prioritize Trading Opportunities:
- Assign higher probability to trades in zones with maximum confluence
- Use tighter stops in zones with strong confluence
- Expect stronger price reactions from these high-confluence zones
The ATR-based approach is particularly valuable in markets with changing volatility, as the zones automatically expand during volatile periods and contract during calmer markets, maintaining their relevance regardless of market conditions. Similarly, the swing high/low midpoint method adapts to the market's own structure, making it effective across different market regimes.
For optimal results, experienced traders often apply multiple calculation methods and look for areas where different approaches converge, creating zones with the highest probability of institutional activity.
How to Trade Using Premium and Discount Zones
Trading Premium and Discount Zones effectively requires a strategic approach and proper confirmation. Here's a comprehensive trading methodology:
1. Trading Discount Zones (Long Opportunities)
When price enters a Discount Zone, consider these steps for potential long entries:
- Patience is Critical: Never enter immediately when price touches a Discount Zone; wait for confirmation of buying interest
- Look for Bullish Candlestick Patterns:
- Hammers or dragonflies indicating strong rejection of lower prices
- Bullish engulfing patterns showing buyers overcoming sellers
- Morning star formations suggesting a potential bullish reversal
- Volume Analysis: Look for increasing volume as price reacts from the Discount Zone, indicating institutional participation
- Order Block Confluence: Discount Zones that overlap with bullish order blocks provide significantly stronger long signals
- Momentum Divergence: Bullish RSI or MACD divergence within a Discount Zone offers additional confirmation
- Stop Placement: Place stops below the lowest point of the reaction within the Discount Zone
- Profit Targets: Consider the fair value reference as an initial target, with extended targets at the Premium Zone
2. Trading Premium Zones (Short Opportunities)
When price enters a Premium Zone, consider these steps for potential short entries:
- Wait for Confirmation: Look for clear evidence of rejection or selling pressure within the Premium Zone
- Identify Bearish Candlestick Patterns:
- Shooting stars or gravestones indicating rejection of higher prices
- Bearish engulfing patterns showing sellers overcoming buyers
- Evening star formations suggesting a potential bearish reversal
- Volume Confirmation: Increasing volume on bearish candles within the Premium Zone suggests institutional selling
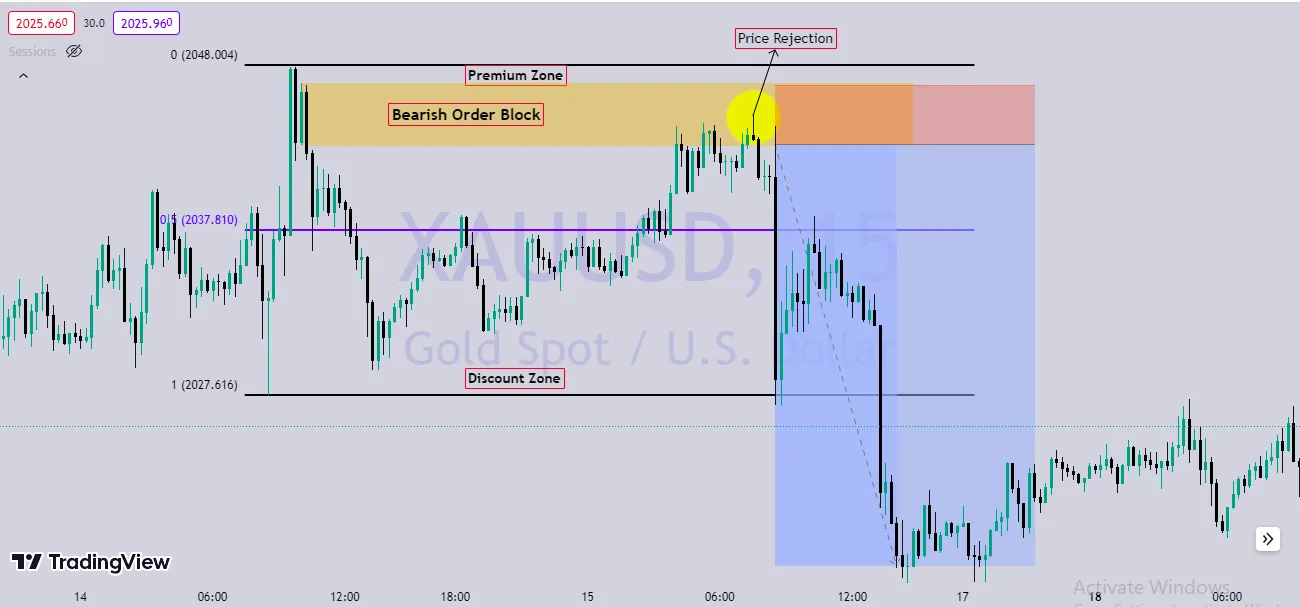
- Order Block Alignment: Premium Zones that coincide with bearish order blocks create high-probability shorting opportunities
- Bearish Divergence: RSI or MACD showing bearish divergence in a Premium Zone strengthens the short case
- Stop Placement: Place stops above the highest point of the reaction within the Premium Zone
- Profit Targets: Target the fair value reference initially, with extended targets at the Discount Zone
3. Multiple Timeframe Analysis
A multiple timeframe approach significantly enhances Premium and Discount Zone trading:
- Higher Timeframe Context: Identify Premium and Discount Zones on higher timeframes (Daily, 4H) for strategic direction
- Lower Timeframe Entries: Use lower timeframes (1H, 15M) to pinpoint precise entries when price reacts from these zones
- Timeframe Alignment: The most powerful setups occur when zones align across multiple timeframes
- Market Structure Considerations: Always evaluate how zones fit into the broader market structure and trend context
4. Risk Management for Zone Trading
Proper risk management is essential for successful Premium and Discount Zone trading:
- Position Sizing: Size positions based on the distance to your stop loss, never risking more than 1-2% of capital per trade
- Defined Stop Levels: Always place stops beyond the extremes of the zone reaction
- Risk-Reward Ratio: Aim for a minimum 1:2 risk-to-reward ratio, preferably 1:3 or higher
- Partial Profit Taking: Consider scaling out of positions at key levels to secure profits while allowing for extended moves
- Failed Zone Reactions: If price moves through a zone without showing expected reaction, be prepared to abandon the setup
Integration with Other Smart Money Concepts
Premium and Discount Zones become even more powerful when integrated with other Smart Money Concepts:
Combining with Order Blocks
Order Blocks that form within Premium or Discount Zones create exceptionally high-probability setups:
- Bullish Order Blocks in Discount Zones: These combinations often lead to strong buying reactions and significant upside movements
- Bearish Order Blocks in Premium Zones: These overlaps frequently result in powerful selling pressure and sustained downside moves
- Entry Strategy: Wait for price to return to the Order Block within the zone and show rejection before entering
- Protection Strategy: Place stops beyond both the Order Block and zone extreme for additional safety
Combining with Fair Value Gaps
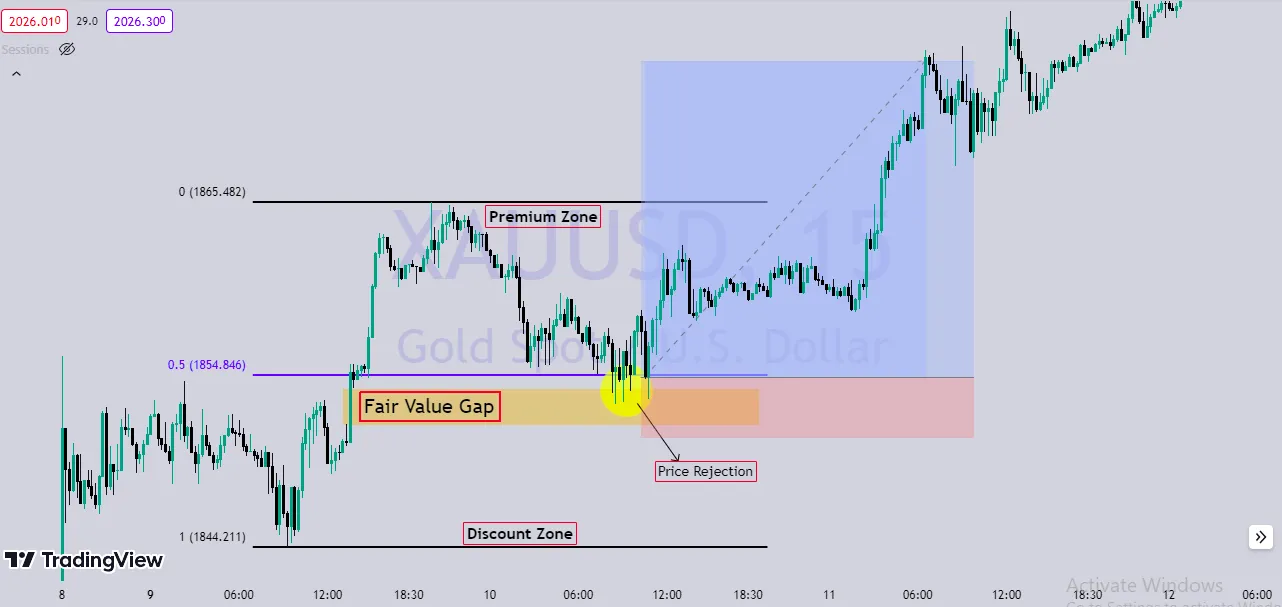
Fair Value Gaps (FVGs) that form within or between Premium and Discount Zones offer excellent trading opportunities:
- Bullish FVGs in Discount Zones: These gaps often fill rapidly when price begins moving back toward fair value
- Bearish FVGs in Premium Zones: These gaps typically fill quickly when price starts correcting back toward equilibrium
- Gap Fill Strategy: Enter when price approaches the FVG within a zone and shows confirmation of the expected move
- Multiple FVG Analysis: When several FVGs exist between zones, they often create a "roadmap" for price movement
Combining with Liquidity Sweeps
Liquidity sweeps near zone boundaries provide powerful trading signals:
- Sweep beyond Premium Zone: Often indicates that institutions have absorbed sell orders and may be preparing to push price lower
- Sweep below Discount Zone: Frequently suggests that institutions have absorbed buy orders and may be positioning for a move higher
- Reversal Strategy: Look for a swift rejection after the sweep, entering in the direction of the expected reversal
- Volume Profile: These sweeps typically show high volume during the extension and decreasing volume during the reversal
Combining with SMT Divergence and Judas Swing
Advanced Smart Money techniques further enhance zone trading:
- SMT Divergence in Zones: Smart Money Divergence that forms within Premium or Discount Zones creates powerful reversal signals
- Judas Swing Formation: When a Judas Swing pattern develops after a zone reaction, it often confirms the beginning of a significant reversal
- Compound Probability: Each additional SMC element that aligns with zone reactions exponentially increases the probability of a successful trade
Common Mistakes When Trading Premium and Discount Zones
Avoid these common pitfalls to improve your Premium and Discount Zone trading results:
- Entering Without Confirmation: The most common mistake is trading solely because price has reached a zone, without waiting for confirmation signals
- Ignoring Market Context: Failing to consider the broader market structure and trend can lead to trading against the primary market direction
- Using Inappropriate Reference Points: Selecting a fair value reference that doesn't accurately reflect market equilibrium reduces zone effectiveness
- One-Size-Fits-All Approach: Using the same percentage or ATR multiplier across all markets without adjusting for specific market characteristics
- Overlooking Multiple Timeframe Alignment: Focusing only on a single timeframe rather than confirming zone reactions across multiple timeframes
- Neglecting Volume Analysis: Not confirming zone reactions with appropriate volume signature reduces trade reliability
- Poor Stop Placement: Placing stops too tight within zones rather than beyond the zone's extreme points
- Forcing Trades: Trying to find zone reactions when none exist, rather than waiting for clear, high-probability setups
Advanced Premium and Discount Zone Techniques
Master these advanced concepts to elevate your Premium and Discount Zone trading strategy:
- Dynamic Zone Adjustment: Instead of static zones, recalculate them regularly as the fair value reference changes
- Zone Strength Classification: Rate zones based on multiple factors (timeframe alignment, volume profile, distance from fair value) to prioritize the highest-probability setups
- Zone Reaction Analysis: Study how price historically behaves after testing similar zones to anticipate likely reactions
- Multiple Reference Confluence: Use several fair value references simultaneously (e.g., 200 EMA, VWAP, and session open) to identify zones with the highest institutional interest
- Session-Based Approach: Calculate separate zones for different trading sessions based on their unique volatility characteristics
- Adaptive Zone Widths: Dynamically adjust zone widths based on recent volatility rather than using fixed measurements
- Order Flow Analysis: Incorporate order flow data when available to confirm institutional activity within zones
- Zone Exhaustion Recognition: Identify when a zone has been tested multiple times and may be losing its effectiveness
Conclusion
Premium and Discount Zones represent a sophisticated approach to understanding institutional price perspectives and identifying areas where smart money engages with the market. These zones go beyond simple overbought/oversold conditions to highlight significant deviations from fair value that attract institutional activity.
The most successful traders use these zones not as standalone signals but as part of an integrated Smart Money Concepts framework. By combining Premium and Discount Zones with Order Blocks, Fair Value Gaps, and proper market structure analysis, traders can develop a comprehensive understanding of institutional intentions and position themselves accordingly.
Remember that mastering Premium and Discount Zone trading requires practice, patience, and proper risk management. Start by identifying these zones on historical charts and observing how price reacts, gradually implementing them in your trading as your pattern recognition skills develop. With consistent application, these powerful concepts can significantly enhance your trading edge and help you align with, rather than against, institutional order flow.